Description
A Keto Sourdough Starter is a living culture of wild yeasts and beneficial bacteria cultivated from flour and water. It’s the heart of sourdough baking — giving rise and flavor without commercial yeast. But traditional starters rely on high‑carbohydrate flours like wheat or rye. This version instead uses low‑carb, keto‑friendly flours and a gentle fermentation method to develop a tangy, healthy culture that can leaven and flavor keto breads, pancakes, waffles, and flatbreads without spiking blood sugar.
Unlike commercial yeast, a sourdough starter adds depth of flavor, natural fermentation, digestive benefits, and a signature sour note keto bakers crave. But making one from scratch — especially low‑carb — requires patience and technique. This guide walks you through every step, with tips and troubleshooting so even beginners can succeed.
By the end, you’ll have a vibrant starter with lively bubbles, a pleasant tang, and the power to transform your keto baking forever.
Why Keto Sourdough Starter Works
Fermentation happens when wild yeasts and lactobacilli feed on the sugars in flour. In a low‑carb context, certain flours and a bit of patience help the microbes thrive:
- Psyllium husk and almond flour provide structure and accessible sugars for bacteria.
- Filtered water keeps chlorine and additives from inhibiting growth.
- Consistent feeding strengthens activity over time.
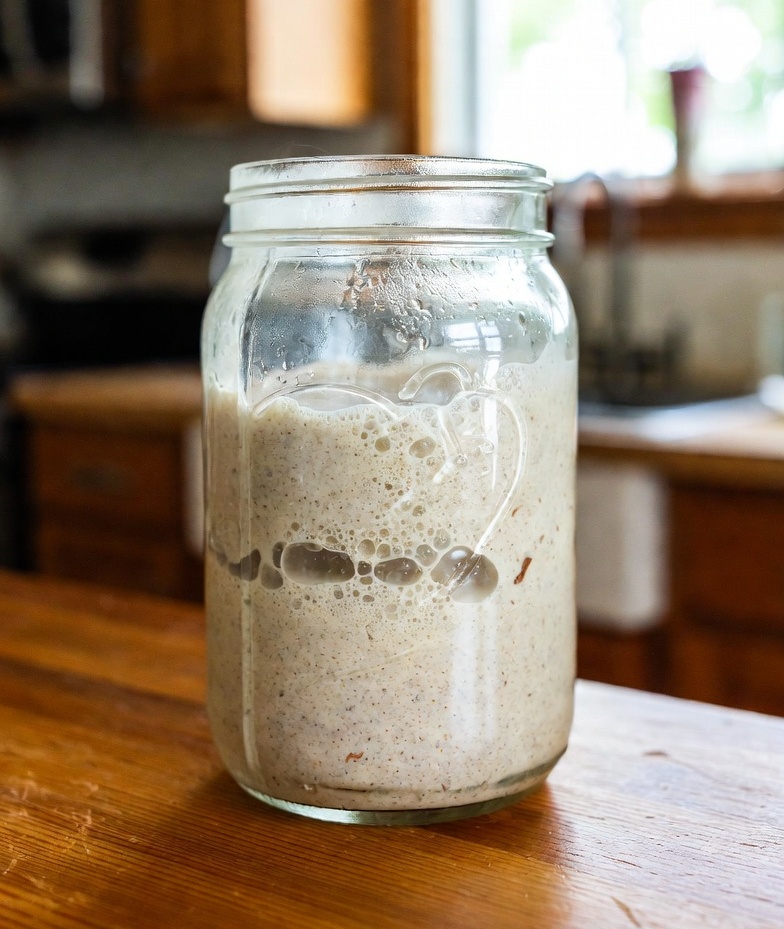
The result is a starter that smells mildly sour and yeasty, shows bubbles, and doubles in size when healthy — perfect for fermenting keto batters.
Servings: About 1 cup | Prep Time: 5 minutes | Cook Time: None
Ingredients
You only need three pantry staples to get started:
- ½ cup superfine almond flour — gentle texture, feed for microbes
- 2 tbsp psyllium husk powder — structure, accessible fiber
- ½ cup filtered water (room temperature) — chlorine‑free for healthy microbes
That’s it. Over the first week you’ll feed the starter with small amounts of these same ingredients.
Optional Tools (Not Ingredients)
- A clear glass jar (16–20 oz)
- A breathable cloth or coffee filter with a rubber band
- A scale (helpful but not required)
Time Breakdown
- Prep Time (initial mixing): 5 minutes
- Fermentation Start: Day 1
- Maturation Time: 5–7 days of feedings
- Total Time Until Ready: ~7 days
Equipment
- Clean glass jar with loose cover
- Spoon or spatula for mixing
- Kitchen scale (optional)
- Filtered or bottled water
Step‑by‑Step Instructions
Day 1 — Mix Your Starter
- In a clean jar, combine:
- ½ cup superfine almond flour
- 2 tbsp psyllium husk powder
- ½ cup filtered water
- Stir thoroughly until no dry lumps remain.
- Scrape down the sides, loosely cover with cloth, and let rest at room temperature (70–75°F / 21–24°C).
At this stage, there may be tiny bubbles or none at all — that’s normal.
Days 2–7 — Feed Daily
Each morning (every 24 hours), follow this routine:
- Discard half of the starter (this balances acidity and keeps it healthy).
- Add:
- ¼ cup superfine almond flour
- 1 tbsp psyllium husk powder
- ¼ cup filtered water
- Stir until smooth, cover loosely, and rest at room temperature.
Over the first few days, you should start to see:
- Small bubbles forming
- A mild tangy or slightly fruity aroma
- Slight rise and fall after feeding
By Day 6–7, the starter should be:
- Doubling in size within 4–8 hours of feeding
- Full of fine bubbles
- Pleasantly tangy (not unpleasant)
This means it’s ready to use for baking.
How to Tell It’s Healthy
- Bubbling vigorously after feeding
- Doubling in size
- Pleasant sour smell (yogurt‑like or apple cider vinegar)
- No discoloration (gray or pink streaks are bad)
If your starter smells bad (rotten) or shows mold, discard and start over.
How to Use Your Keto Sourdough Starter
Once active, you can:
- Use it to make keto sourdough pancakes
- Add to low‑carb bread batters
- Ferment waffles, muffins, or flatbreads
- Give your keto baking tang and depth without commercial yeast
Just substitute a portion of flour and liquid in your recipe with starter, adjusting for hydration.
Feeding & Storage
- Daily Feeding: If kept at room temperature
- Refrigerator: Feed once weekly if stored cold
- Refresh Before Baking: Feed 4–8 hours before use for maximum lift
Texture & Flavor Profile
- Appearance: Thick, glossy, speckled beige
- Texture: Foam‑like bubbles; spreads like pancake batter
- Aroma: Mildly sour, slightly yeasty
- Flavor: Tangy with a gentle acidity — not harsh
| Nutrient | (Approximate Per ¼ Cup of Starter) |
|---|---|
| Calories | 60 |
| Fat | 5g |
| Net carbs | 3g |
| Fiber | 2g |
| Protein | 2g |
Troubleshooting
No Activity by Day 3–4
- Try warmer location
- Use water at room temp
- Ensure psyllium and almond are superfine
Off or Foul Smell
- Starter may be too acidic — discard half and feed fresh flour + water
Starter Thick & Isn’t Rising
- Add a little more water on feeding days
- Ensure even mixing
Serving & Usage Ideas and recipes below
- Keto Sourdough Pancakes
- Keto Sourdough Bread
- Fermented low-carb waffles
- Sourdough crackers
- Soft sprouted sourdough breads
- Sourdough pizza crust (keto version)
Pro Tips for Best Results
- Use filtered water to avoid chlorine
- Keep jar in a warm, stable spot
- Feed consistently at the same time daily
- Adjust water slightly to keep consistency like thick pancake batter

Pingback: Keto Sourdough Bread (Low-Carb, Naturally Fermented) - www.mydiet360.com
Pingback: Keto Sourdough Pancakes (Fluffy, Golden & Low-Carb) - www.mydiet360.com